

Lollipop Ornament Crochet Pattern
Day 2 of the 12 Days of Crochet Christmas is a sweet lollipop ornament crochet pattern. This is actually one that didn’t quite make the cut last year so I decided to rework it for this years event and I love it so much more now.

There’s something so fun and festive about lollipops at Christmas and this lollipop ornament crochet pattern might just be one of my favourites. Simple, yet effective.
About the Pattern
This lollipop ornament crochet pattern is quick and easy. All the pieces are worked separately and we will use surface slip stitching to create the swirl on the front and then join the 2 main pieces together.
The lollipop stick and bow are sewn on at the end and I stiffened the stick using a mixture of PVA glue and water. It’s an optional step but I’ve included the ratios in the pattern if you’d like to give it a try.
More Patterns
If you love this lollipop ornament crochet pattern, you might also like to check out these other Christmas patterns:


Lollipop Ornament Crochet Pattern
Materials
- DK weight yarn in white, an accent colour and beige (I used Paintbox Yarns Cotton DK in Paper White, Pillar Red/Slate Green and Light Caramel)
- 2.5mm crochet hook
- Yarn/twine for hanging
- Stitch marker, yarn needle, scissors
- Optional: PVA glue for starching
Abbreviations (US Terms)
- ch – chain
- sc – single crochet
- hdc – half double crochet
- hdc-inc – half double crochet increase
- sl st – slip stitch
- st/s – stitch/es
- […] – repeat the instructions in brackets
- (…) – indicates stitch count at end of round
Useful Links
Finished Size
The finished lollipop measures approximately 3.25″ (8.5cm) long. Size may vary depending on tension and materials used.
Gauge
Gauge is not important in this pattern. However, using a different yarn and hook size will change the size of the finished item.
Notes
- Pieces are worked in a continuous spiral starting with a magic ring unless otherwise specified. Mark the first stitch of each round with a removable stitch marker.
- The lollipop stick is worked in the back bump of the chain.
Identifying the Back Bump of a Chain
If you look at the front of your starting chain you will see the front loop and back loop of your chain stitches. Flip your chain over so you’re looking at the back. You will see a line of stitches running down the center, these are the back bumps of each chain.


Pattern Instructions
Lollipop (make 2, white)
R1: 8 hdc in magic ring (8)
R2: [Hdc-inc] x8 (16)
R3: [Hdc, hdc-inc] x8 (24)
R4: Hdc, hdc-inc, [2 hdc, hdc-inc] x7, hdc (32)
R5: Sc, sl st – leave the rest of the sts unworked
Fasten off invisibly and weave in ends.
Stick (beige)
Ch 11, working into the back bump of the chain, sc in second ch from hook and in each chain across (10)
Fasten off leaving a long tail for sewing.
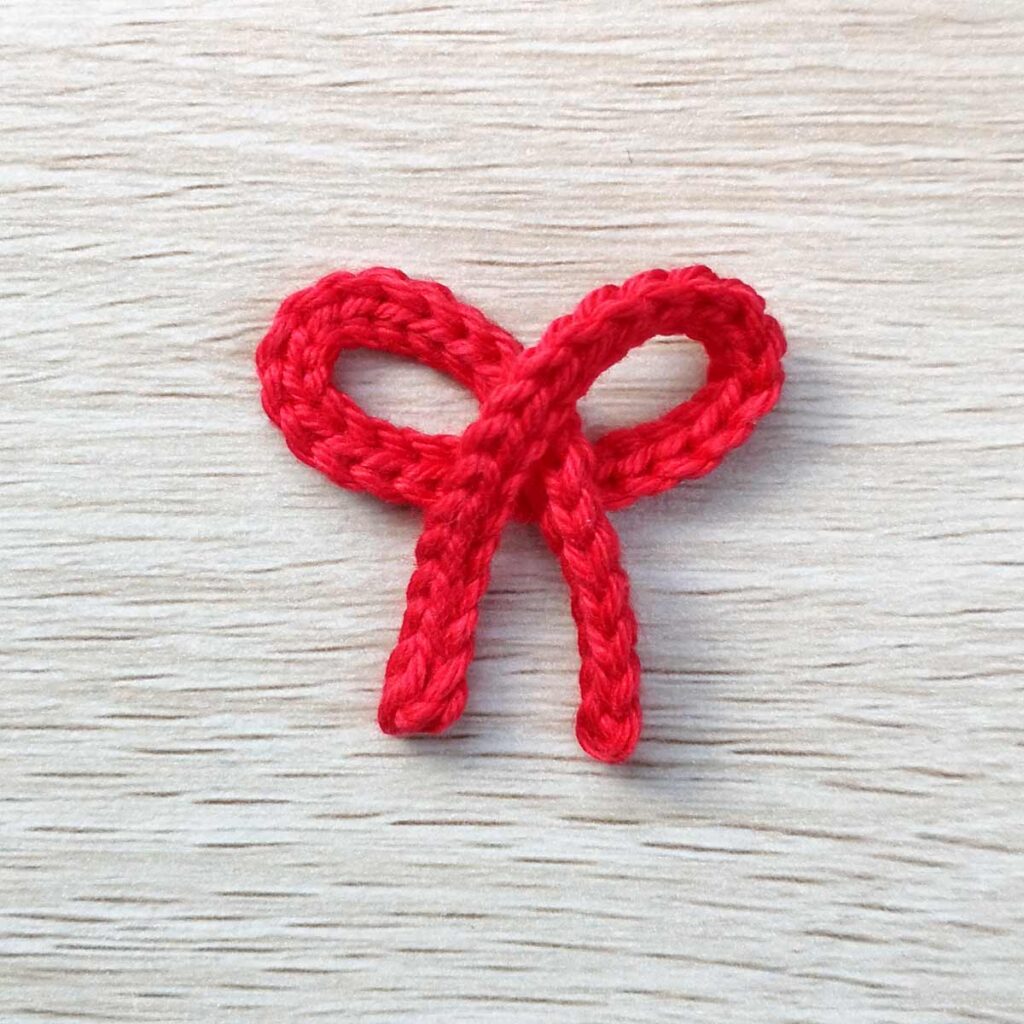
Bow (accent colour)
Ch 46 (or until chain measures approximately 18.5cm long), sl st in second ch from hook and in each ch across (45)
Fasten off and weave in ends.
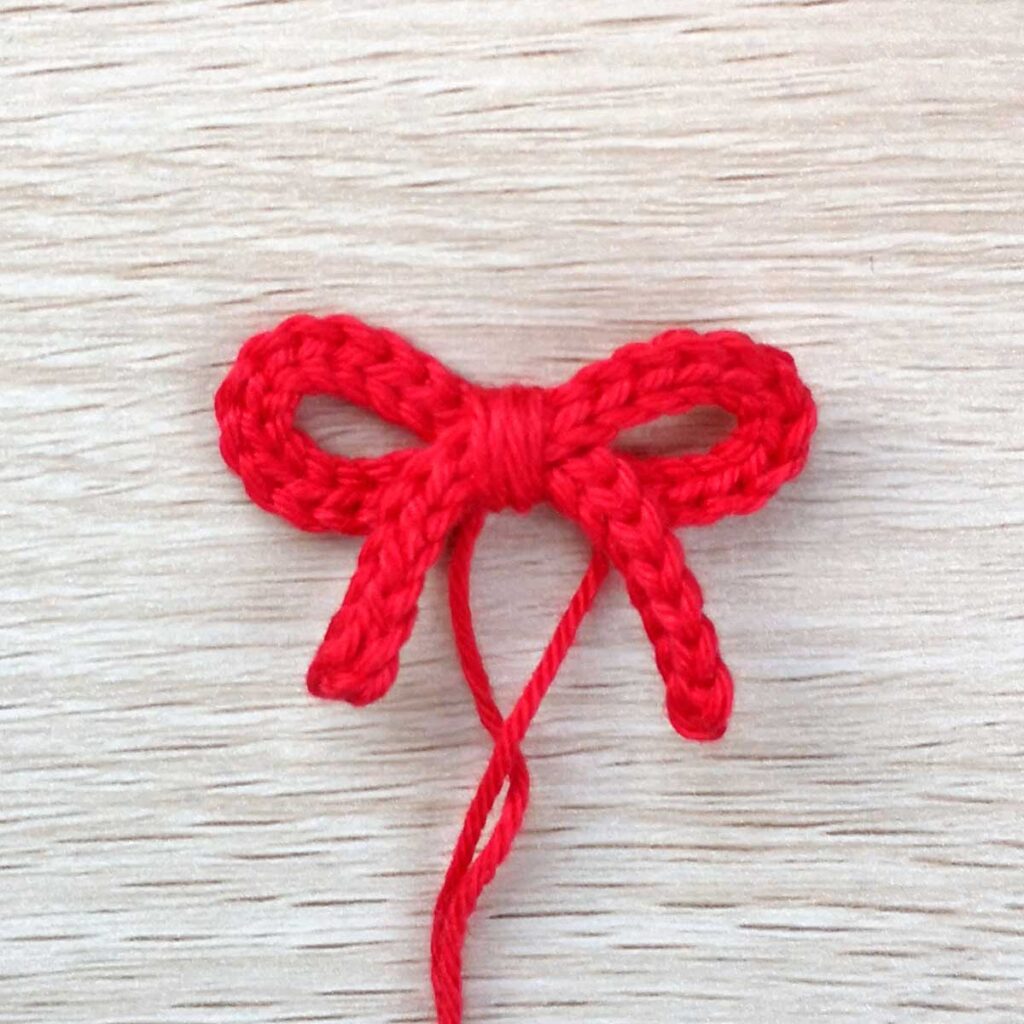
Assemble the bow by folding in the two ends to create a bow shape. Using a long piece of yarn, wrap around the middle of the shape to create the centre of the bow. Wrap as many times as you like until you reach your desired look.
Tie the ends in a knot at the back and leave them for sewing the bow to the lollipop.
Finishing
Take one of your lollipop pieces (this will be the front) and with the right side facing up, surface sl st starting from the first st of R1 with accent colour. Continue to sl st between the rounds until you reach the very edge. (If you wish, you can repeat this step on the back piece as well).
Without fastening off, place the other lollipop piece behind the front piece with wrong sides facing. Continuing from the front piece, sl st together through the inner loops only (the back loops of the piece facing you and the front loops of the piece behind).
Fasten off and weave in end.
Assembly
- Sew the lollipop stick to the bottom of the lollipop.
Optional: Create a starch solution using 1 part PVA glue and 1 part water. Dip the lollipop stick in the solution, run your fingers down the length of the stick to remove excess and gently shape. Leave to dry completely. Make sure the stick is slightly elevated while drying so it doesn’t stick to anything.
- Sew the bow to the lollipop centred over the stick.
- Attach a hanging loop.
not ready to make this yet?
Pin this post for later

Explore More Crochet Patterns
After you crochet this lollipop, here are some more crochet patterns to try!
- Hot Chocolate Ornament Crochet Pattern
- Christmas Pudding Ornament Crochet Pattern
- Crochet Candy Cane Ornament Pattern
What’s Next?
Have questions? Join the Facebook group!
We hope you enjoyed this pattern. Come and hang out with me in the Stitch by Fay Community Facebook group. We created this space for you to share pictures, ask questions and support each other.

This pattern is for personal use only and may not be copied, reproduced, altered, published or distributed in any format (including video). If you wish to share this pattern, you may link to this pattern but please do not reprint it on your site.
You can sell finished products made from this pattern in small quantities. Do NOT use our photos as your sale photos.