

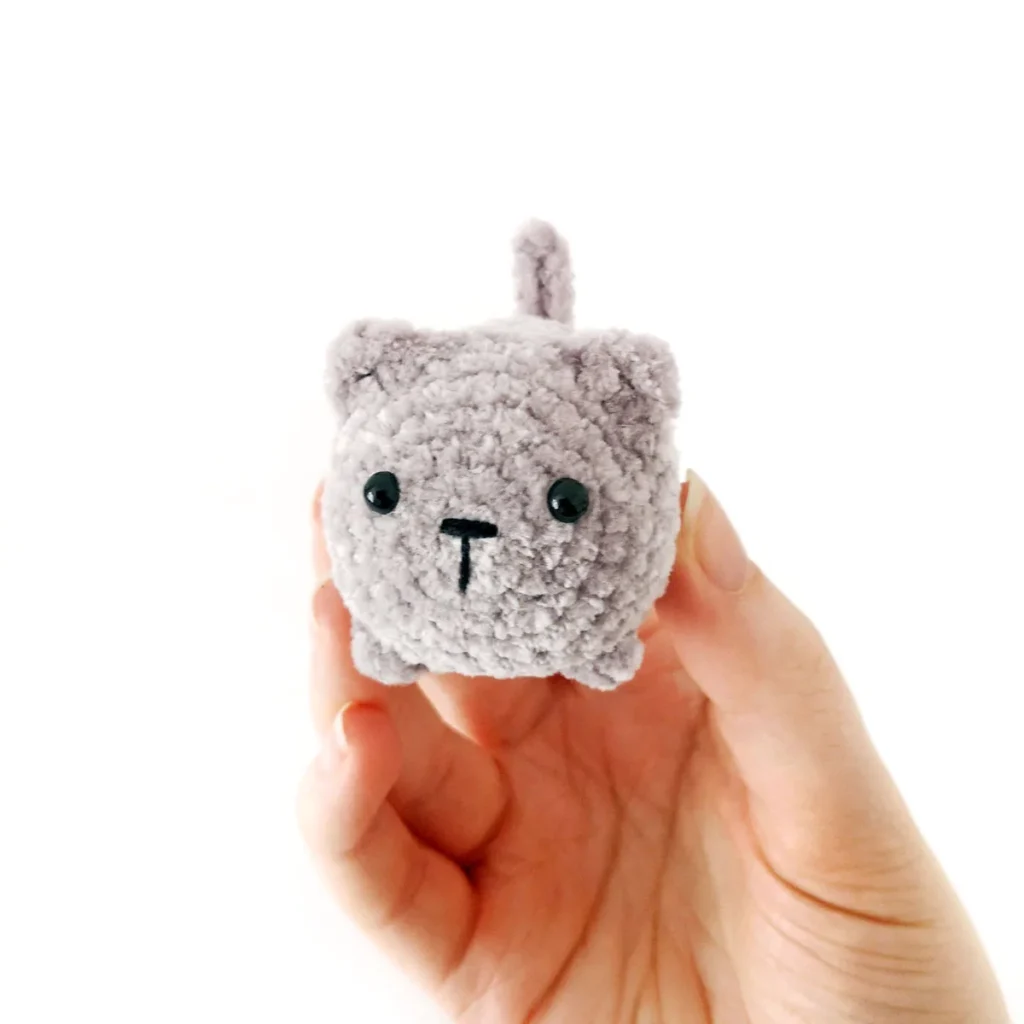
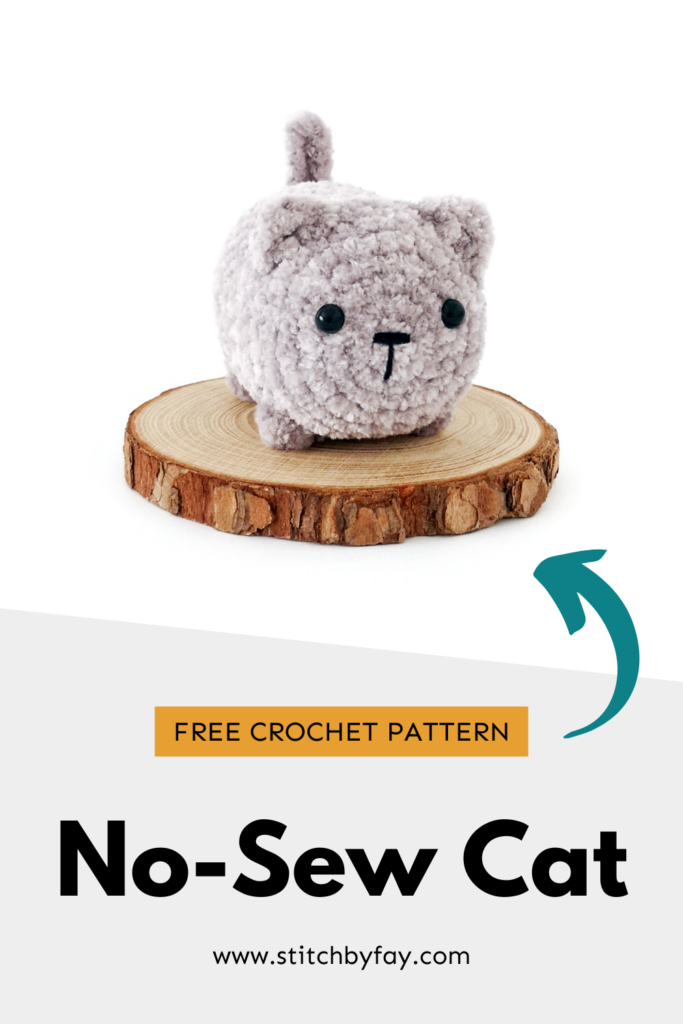
No-Sew Crochet Cat Pattern
Looking for a quick and easy crochet cat pattern without the hassle of sewing? Look no further! This little cat is a sweet and simple project purrfect for all my fellow cat lovers.

I am definitely a cat person and this crochet cat pattern ticks all the boxes – quick, cute and no-sew!
It’s ideal for stash busting, market prep and last minute gifts.
About the Pattern
This crochet cat pattern is worked in one piece in a continuous spiral. The ears and feet are worked as you go and the tail is crocheted on at the end.
Because this is a no-sew pattern and we’re working in the round without joining, you may need to adjust the placement of the popcorn stitches to ensure that the feet line up properly.
Pattern Update
There is an updated version of this pattern available.
The update features:
- Bobble stitch feet
- More robust tail construction
- Written instructions to make a Siamese variation
where to buy
Recommended Yarn
You can use any yarn weight and fiber to make your crochet cat.
I chose to use a lightweight chenille yarn for the cats pictured as I love the fuzzy look and the overall finished size when using thinner yarn.
If you plan on using super bulky yarn, I would make the following adjustments:
R1: Ch 2, 8 sc in second ch from hook (8)
R2: [Inc] x8 (16)
R3: [Sc, inc] x8 (24)
Proceed with the pattern as written starting from R5.
No matter the yarn, don’t forget to use the appropriate hook size and adjust the size of the safety eyes if needed.

Easy Gifting
If you’re making this crochet cat for gifts or market prep, grab the printable adoption certificate from the Stitch by Fay freebie library.
Freebie Library
Join our newsletter to gain access to exclusive freebies and keep up to date.
Already a member? Login here.
Why You’ll Love This Crochet Cat Pattern

More Patterns
If you love this crochet cat pattern, you might also like to check out these other no-sew patterns:


No-Sew Crochet Cat Pattern
Prefer the PDF version?
where to buy
The ad-free PDF includes detailed instructions and photos as well as easy print pages.
Materials
- DK weight chenille yarn in grey (I used DMC Happy Chenille in Hefalump)
- 3mm crochet hook
- 4 ply yarn in black or black embroidery floss
- 6mm safety eyes
- Polyester fiberfill
- Stitch marker
- Yarn needle
- Scissors
Abbreviations (US Terms)
- ch – chain
- dc – double crochet
- FLO – front loop only
- hdc – half double crochet
- inc – increase
- invdec – invisible decrease
- pc – popcorn stitch
- sc – single crochet
- sl st – slip stitch
- st/s – stitch/es
- tr – treble crochet
- […] – repeat the instructions in brackets
- (…) – indicates stitch count at end of round
Special Stitches
Popcorn Stitch (pc)
- Work 4 dc stitches in the same stitch.
- Remove your hook from the last dc and insert it under both loops of the first dc.
- Grab the dropped loop with your hook and pull it through the stitch.
- Ch 1 to close.
Useful Links
Finished Size
The finished cat measures approximately 2.5″ (6.5cm) long. Size may vary depending on tension and materials used.
Gauge
Gauge is not important in this pattern. Use a hook size to match your chosen yarn. Make sure that your stitches are tight enough to prevent stuffing showing through and adjust hook size if necessary.
Notes
- Pieces are worked in a continuous spiral starting with a magic ring unless otherwise specified. Mark the first stitch of each round with a removable stitch marker.
- This is a no-sew pattern. The ears and feet are crocheted as you go and the tail is added at the end.
- I’m using a chain 2 start as I find it easier with this type of yarn. Feel free to use a magic ring if you prefer.
- Popcorn stitches are used for the feet (see special stitches). When working the next round, place a single crochet in the top of each popcorn.
Pattern Instructions
Cat (grey)
R1: Ch 2, 6 sc in first ch (6)
R2: [Inc] x6 (12)
R3: [Sc, inc] x6 (18)
R4: Sc, inc, [2 sc, inc] x5, sc (24)
R5: [3 sc, inc] x6 (30)
R6: [Sc] x30 (30)
Note: In this next round we will be creating the ears by working some stitches in the front loop only.
R7: 10 sc, FLO hdc, [dc, tr, dc] in FLO of next st, FLO hdc, 4 sc, FLO hdc, [dc, tr, dc] in FLO of next st, FLO hdc, 10 sc
Note: In R8 you will sc into the leftover back loops behind the ears. We will also be adding the front feet over the next 2 rounds. You may need to shift the position of the popcorn sts by a st or 2 depending on your tension and the yarn used. They should be inline with the ears.
R8: 28 sc, pc, sc (29 sc + 1 pc)
Pause here to add the face.
Using 4 ply black yarn or black embroidery floss, sew a nose and mouth using horizontal and vertical sts. The nose sits across the top of R1.
Insert the safety eyes between R3 and R4, approximately 1 st up from the nose. The most important part here is to make sure that they’re level with each other.
R9: 4 sc, pc, 25 sc (29 sc + 1 pc)
R10-14: [Sc] x30 (30) 5 rounds
Note: In this next round we will be adding the back feet. You may need to adjust the placement of the popcorn sts, they should be inline with the front feet.
R15: Pc, 5 sc, pc, 23 sc (28 sc + 2 pc)
R16: [Sc] x30 (30)
R17: [3 sc, invdec] x6 (24)
Start stuffing and continue to stuff as you go.
R18: Sc, invdec, [2 sc, invdec] x5, sc (18)
R19: [Sc, invdec] x6 (12)
R20: [Invdec] x6 (6)
Cut the yarn leaving a tail and pull through last st. Weave the yarn tail through the front loop only of the final round and pull to close. Hide the end inside the cat.
Attaching the Tail
You want to centre the tail with the ears. Start by marking the centre st between R17 and R18 with a stitch marker. Join yarn in the st directly next to the stitch marker.

Ch 7, sc in second ch from hook and in each ch across (6)
Cut the yarn leaving a tail and pull through last st. Using a yarn needle, bring the tail down in the next st over. Weave in ends.
not ready to make this yet?
Pin this post for later
FAQ
Explore More Crochet Patterns
After you crochet this cat, here are some more crochet patterns to try!
What’s Next?
Have questions? Join the Facebook group!
We hope you enjoyed this pattern. Come and hang out with me in the Stitch by Fay Community Facebook group. We created this space for you to share pictures, ask questions and support each other.

This pattern is for personal use only and may not be copied, reproduced, altered, published or distributed in any format (including video). If you wish to share this pattern, you may link to this pattern but please do not reprint it on your site.
You can sell finished products made from this pattern in small quantities. Do NOT use our photos as your sale photos.
I have made two of these, and every time I did a popcorn stitch I ended up a stitch short, do you know what may be happening?
Hi, the popcorn stitch is quite bulky. Is it possible that you’re accidentally skipping the stitch right next to it? It can be hard to see especially if you’re using a plush yarn.
I’ve made a couple of them which one was already given away, totally love this pattern and thank you for sharing 😍
Hi there. I have a stitch count of 34 for row 7 and I know for row 8 there should be 29sc+1pc. Where did I go wrong? Am I supposed to skip two stitches on each ear and sc together?
Thanks!
Hi! That sounds right. Because the [dc, tr, dc] in R7 is worked all in one stitch, you’ll only have one stitch behind each ear to work into in R8 so the stitch count should work itself out.
can I put it in a raffle basket with other items?
Yes you can 🙂
Very cute
why is there a pc st on row 9? what does that stitch make?
It makes the other front foot 🙂
Hi, I love this little cat.
Is there a printable pdf version please?
Many thanks
Fran
Hi, there’s an updated PDF available on Etsy: https://stitchbyfay.etsy.com/listing/1792379681
What is invdec?
Invisible decrease 🙂
Thank you so much for this great pattern! My loaf cat army is growing fast and will soon take over … my living room, lol!
Oh my goodness he’s so cute! I made him out of grey faux fur yarn and left the tail off. A perfect baby wombat ❤️❤️