

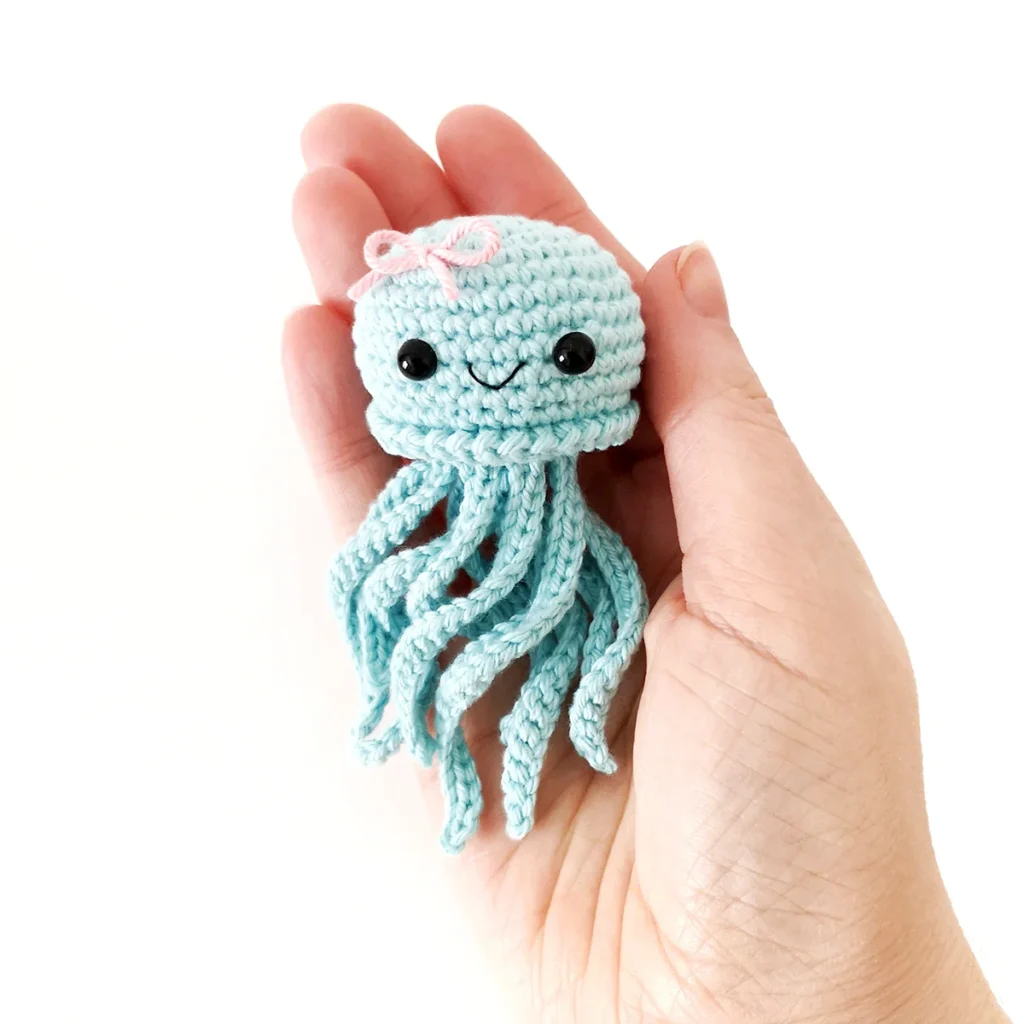
No-Sew Crochet Jellyfish Pattern
This no-sew crochet jellyfish pattern is a simple, fun project that comes together quickly with just a few basic stitches.
It’s great for using up leftover yarn and doesn’t require any sewing making it perfect for market prep and gifts.
My no-sew whale pattern has been a bestseller and fan favourite for the last couple of years and I wanted to create a companion no-sew sea critter.
I feel like jellyfish are almost a rite of passage for new crocheters, I know I made a few when I was first starting out and they always turned out super cute. They make a popular market choice too and look great in a variety of colours.
This mini crochet jellyfish makes it the perfect size for keychains and bag charms.
About the Pattern
This crochet jellyfish is worked in a spiral from the top down. We’ll be crocheting some rounds in the back loop only to give us a base for working the tentacles and trim off.
I used regular single crochet decreases when working in the back loops which aren’t the prettiest but luckily they’re hidden by the tentacles.
There are 11 tentacles in total of varying lengths. While the tentacles are a bit tedious to make, this is a no-sew pattern, so at least you don’t have to crochet them separately and sew them on (yay for silver linings).
We’ll finish our little crochet jellyfish with a tiny bow for extra cute factor.

Recommended Yarn
You can use any yarn weight and fiber to make your crochet jellyfish. I used Paintbox Yarns Cotton DK in Washed Teal and Blush Pink for these keychain sized jellies.
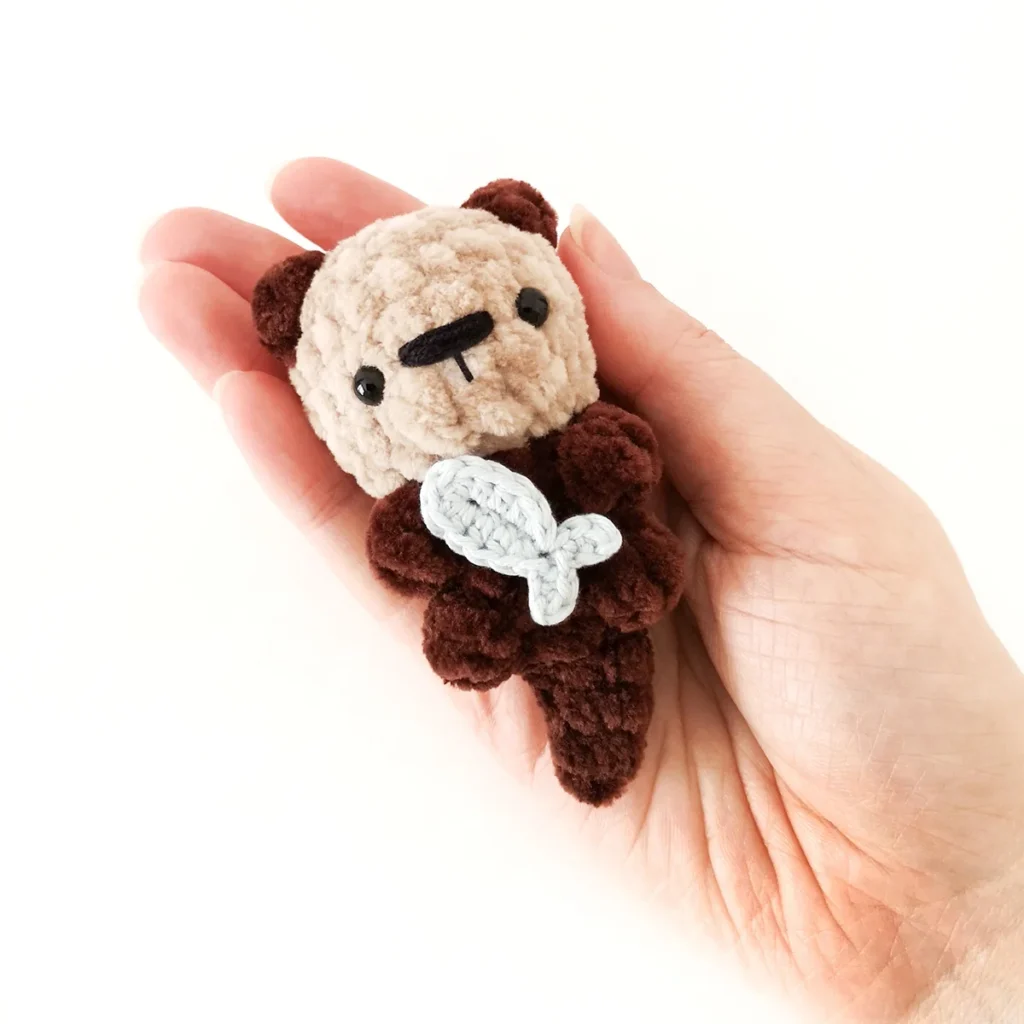
This crochet jellyfish pattern also works well with plush yarn with a few minor adjustments. The only issue I had was that it can be hard to see the front loops when crocheting the tentacles so I recommend using lots of stitch markers.
For the plush jellyfish below I used Premier Yarns Parfait Chunky, a 4.5mm hook and 10mm safety eyes.
How to make a plush jellyfish:
R1: Ch 2, 8 sc in second ch from hook (8)
R2: [Inc] x8 (16)
R3: [Sc, inc] x8 (24)
Proceed with the pattern as written starting from R5.
You may need to adjust the placement of the eyes so play around and see what looks good to you. I also added some cheeks and a little side smile.

Why You’ll Love This Crochet Jellyfish Pattern
More Crochet Patterns
If you love this crochet jellyfish pattern, you might also like to check out these other fun patterns:


No-Sew Crochet Jellyfish Pattern
Prefer the PDF version?
where to buy
The ad-free PDF includes detailed instructions and photos as well as easy print pages.
Materials
- DK weight yarn in a colour of your choice plus a small amount of contrasting colour for the bow (I used Paintbox Yarns Cotton DK in Blush Pink and Washed Teal)
- 2.5mm crochet hook
- 6mm safety eyes
- Black embroidery floss
- Polyester fiberfill
- Stitch marker, yarn needle, scissors
Abbreviations (US Terms)
- ch – chain
- sc – single crochet
- inc – increase
- invdec – invisible decrease
- dec – decrease
- sl st – slip stitch
- st/s – stitch/es
- […] – repeat the instructions in brackets
- (…) – indicates stitch count at end of round
Useful Links
Finished Size
The finished jellyfish measures approximately 4″ (10cm) long. Size may vary depending on tension and materials used.
Gauge
Gauge is not important in this pattern. However, using a different yarn and hook size will change the size of the finished item.
Notes
- Pieces are worked in a continuous spiral. Mark the first stitch of each round with a removable stitch marker.
- R13 and R15 are worked entirely in the back loop only.
- Close up the final round through the back loop only.
Pattern Instructions
Jellyfish
R1: 6 sc in magic ring (6)
R2: [Inc] x6 (12)
R3: [Sc, inc] x6 (18)
R4: Sc, inc, [2 sc, inc] x5, sc (24)
R5: [3 sc, inc] x6 (30)
R6: 2 sc, inc, [4 sc, inc] x5, 2 sc (36)
R7-11: [Sc] x36 (36) 5 rounds
R12: 2 sc, invdec, [4 sc, invdec] x5, 2 sc (30)
R13: Work the entire round in the back loop only – [BLO 3 sc, dec] x6 (24)
Insert safety eyes between R9 and R10, 5 sts apart.
R14: [Sc, invdec] x8 (16)
Start stuffing and continue to stuff as you go. Focus stuffing towards the edges to try and keep the bottom as flat as possible.
R15: Work the entire round in the back loop only – BLO sc, dec, [2 sc, dec] x3, sc (12)
R16: [Invdec] x6 (6)
Cut the yarn leaving a tail and pull through last st. Weave the yarn tail through the back loop only of the final round and pull to close. Hide the end inside the jellyfish.
Tentacles
Insert hook in first leftover front loop from where we closed up the final round and pull up a loop of yarn.
R1: [Ch 25, sl st in second ch from hook and in each ch across, sl st in next 2 front loops] x2, ch 25, sl st in second ch from hook and in each ch across, sl st in last remaining front loop (3 tentacles)
Sl st in last leftover front loop from R15 (mark this front loop with a stitch marker), sl st into first front loop from R15.

R2: Working in a clockwise direction – [ch 21, sl st in second ch from hook and in each ch across, sl st in next 2 front loops, ch 17, sl st in second ch from hook and in each ch across, sl st in next 2 front loops] x3, ch 21, sl st in second ch from hook and in each ch across, sl st in next 2 front loops, ch 17, sl st in second ch from hook and in each ch across, sl st in last remaining front loop that we marked with a st marker (8 tentacles)
Fasten off and weave in ends.
Arrange the tentacles how you would like them to sit. If they’re too curly for your liking, you can gently stretch them out to loosen the stitches.
Trim
Tip: Keep the chains loose between slip stitches.
Insert hook in first leftover front loop from R13 and pull up a loop of yarn.
R1: [Ch 1, sl st in next st] x30
Ch 1, do not tighten ch. Fasten off invisibly to first sl st. Weave in ends.
Finishing
- Using a single strand of black embroidery floss, sew a mouth centred between the eyes over R10.
- Cut a length of contrasting yarn, pull through a single stitch between R5 and R6 approximately in line with the left eye. Tie in a bow and trim ends.
not ready to make this yet?
Pin this post for later

Explore More Crochet Patterns
After you crochet this jellyfish, here are some more crochet patterns to try:
What’s Next?
Have questions? Join the Facebook group!
We hope you enjoyed this pattern. Come and hang out with me in the Stitch by Fay Community Facebook group. We created this space for you to share pictures, ask questions and support each other.

This pattern is for personal use only and may not be copied, reproduced, altered, published or distributed in any format (including video). If you wish to share this pattern, you may link to this pattern but please do not reprint it on your site.
You can sell finished products made from this pattern in small quantities. Do NOT use our photos as your sale photos.
If I were to use worsted weight yarn what size hook would I use? 4.5mm?
I recommend using a 3.5mm hook with worsted weight yarn.
I love it. I’ve made 12 so far and I’m gonna leave them in random places as a “random act of chrochet kindness”.