

Crochet Fish Keychain Pattern
Looking for a fun accessory to brighten up your keys or bag? I’ve got you covered with this quick and easy crochet fish pattern.

I’ve been working on a few time consuming projects lately and sometimes I just need something quick to break it up and keep me going. Something that doesn’t take days or even hours to finish.
That is exactly how this little crochet fish came about.
This is a no-sew pattern (yay!) and works up in under an hour (maybe even 30 minutes if you’re not a slow poke like me).
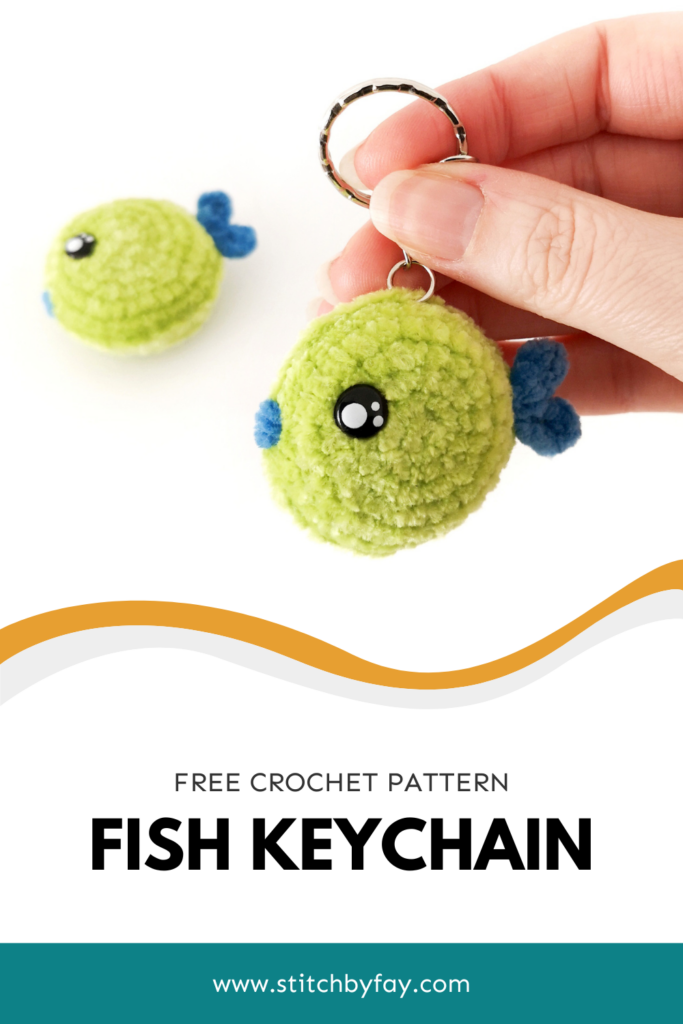
Since it is such a simple project and only uses two colours, I chose to use chenille yarn to give my crochet fish more interest. However, the fuzzy nature of the yarn can make it hard to see your stitches. On the plus side though, it hides mistakes well.

The addition of the kawaii eyes gives it an extra fun touch but it would look equally cute with regular safety eyes or even embroidered eyes.
If you love this crochet fish pattern, you might also like to check out these other keychain patterns: Sun Keychain, Toadstool Sweater Keychain and Lightbulb Keychain.
Crochet Fish Pattern
Materials
- DK weight chenille yarn in 2 different colours (main colour and contrasting colour – I used DMC Happy Chenille in Fizzy and Splash)
- 3mm crochet hook
- 8mm safety eyes
- Polyester fiberfill
- Keychain (I used a 1″ keychain ring with a 1.25″ chain)
- Stitch marker
- Yarn needle
- Scissors
Abbreviations (US Terms)
- ch – chain
- sc – single crochet
- inc – increase
- hdc – half double crochet
- sl st – slip stitch
- st/s – stitch/es
- […] – repeat the instructions in brackets
- (…) – indicates stitch count at end of round
Useful Links
Notes
- The finished item measures approximately 1.75″ x 2.25″ (4.5cm x 6cm) including the tail, when using the materials listed.
- Pieces are worked in a continuous spiral starting with a magic ring unless otherwise specified. Mark the first stitch of each round with a removable stitch marker.
- This is a no-sew pattern. The body is worked flat and slip stitched together and the tail is crocheted directly onto the body.
- I’m using a ch 2 start as I find it easier with this type of yarn. Feel free to use a magic ring if you prefer.
- Gauge is not important in this pattern. Use a hook size to match your chosen yarn. Make sure that your stitches are tight enough to prevent stuffing showing through and adjust hook size if necessary.
LET’S GET STARTED!
Fish (make 2, main colour)
R1: Ch 2, 6 sc in first ch (6)
R2: [Inc] x6 (12)
R3: [Sc, inc] x6 (18)
R4: Sc, inc, [2 sc, inc] x5, sc (24)
R5: [3 sc, inc] x6 (30)
R6: [Sc] x30 (30)
Fasten off the first piece invisibly, do not fasten off the second piece.
Joining
Place both pieces wrong sides together with the second piece on top (the piece that still has the yarn attached).
Sl st together through the inner loops only (the back loop of the side facing you and the front loop of the side facing away from you). Stop when you’re approximately half way around.
Insert safety eyes between R3 and R4 on both sides, approximately 1 round higher than the magic ring. Make sure to look at it head on to check that the safety eyes are aligned with each other before putting the backs on.


Start stuffing and continue to stuff as you go.
Continue to sl st together.
Fasten off invisibly and weave in end.
Mouth
Using contrasting yarn, sew a horizontal line across the sl st join between the eyes approximately 1 st below the centre of the eye. Sew over it 5 times or until you have your desired look.
Tail
The tail is created in a single stitch. There isn’t an exact placement, you want to try and line it up with the centre of the magic ring.

Find the stitch that is roughly inline with the centre of the magic ring on the opposite edge from the mouth. Join contrasting yarn.
[Ch 3, hdc in second ch from hook, sc in next ch, sl st in same st as starting ch] x2
Fasten off and weave in ends.
Attach keychain if desired. If you’re using a keyring and chain like the ones I use, you can just open the jump ring and slip it through a stitch at the top or you can sew it in place using matching yarn.

PIN for later
I love seeing your creations! Feel free to send me a photo or tag me on Instagram @stitchbyfay and use the hashtag #stitchbyfaypatterns.

This pattern is for personal use only and may not be copied, reproduced, altered, published or distributed in any way. If you wish to share this pattern, you may link to this pattern but please do not reprint it on your site. You can sell finished products made from this pattern in small quantities. Do NOT use our photos as your sale photos.
This post contains affiliate links. If you make a purchase from these links, I may make a small commission at no extra cost to you – thanks for your support!