

Granny Square Crochet Book Sleeve Pattern
If you’re a book lover who also loves to crochet, this is the perfect project for you!
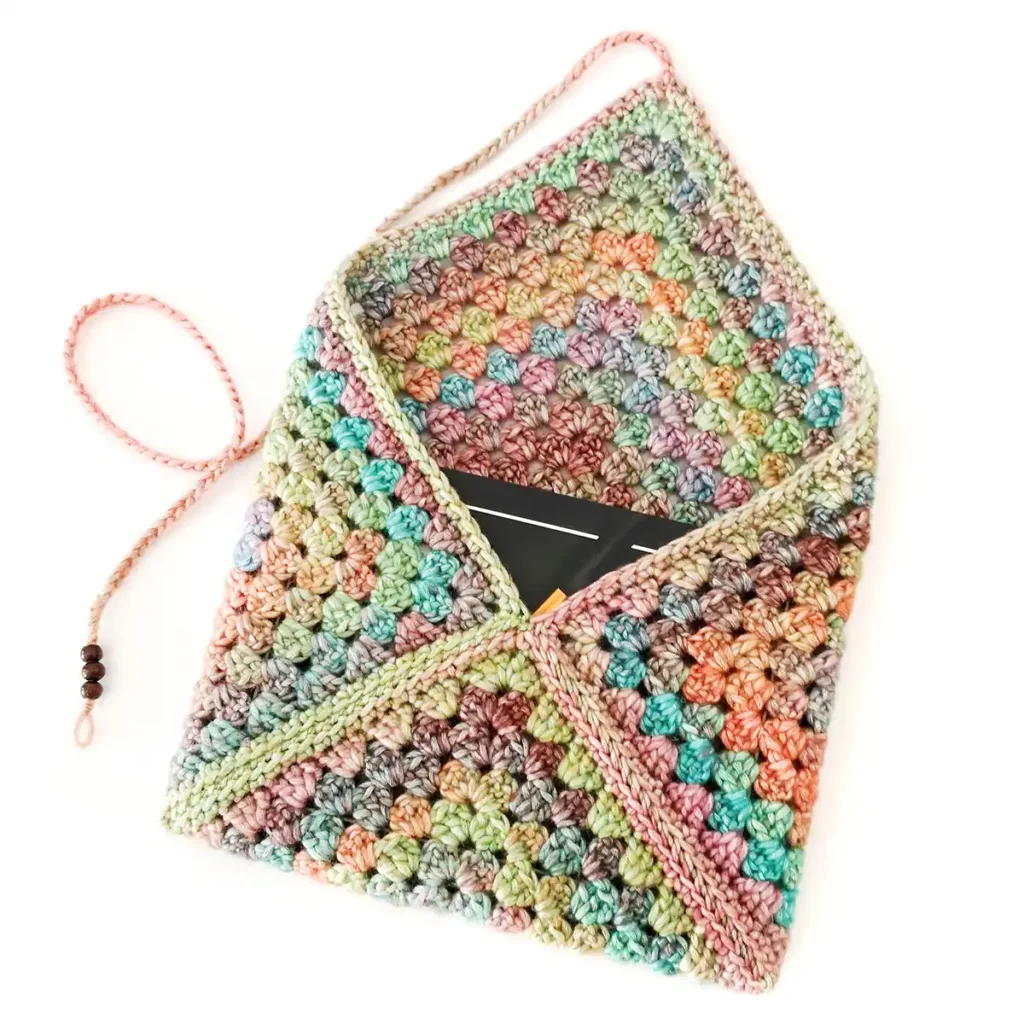
A crochet book sleeve is a fun, practical way to protect your favorite reads from bent covers, coffee spills and the chaos of everyday life. Make it for yourself or as a gift for a fellow bookworm.
After sharing my finished book sleeve on Instagram, I had a few people asking for the pattern so I thought I’d share my process.
Bear in mind that this is more of a guide than an actual pattern as you’ll be creating a book sleeve to fit your specific book.
What is the Point of a Book Sleeve?
A book sleeve is essentially a protective pouch to prevent damage to your books when on the go. Say goodbye to bent corners and scratched covers. You can also use this book sleeve to protect your Kindle.
About the Pattern
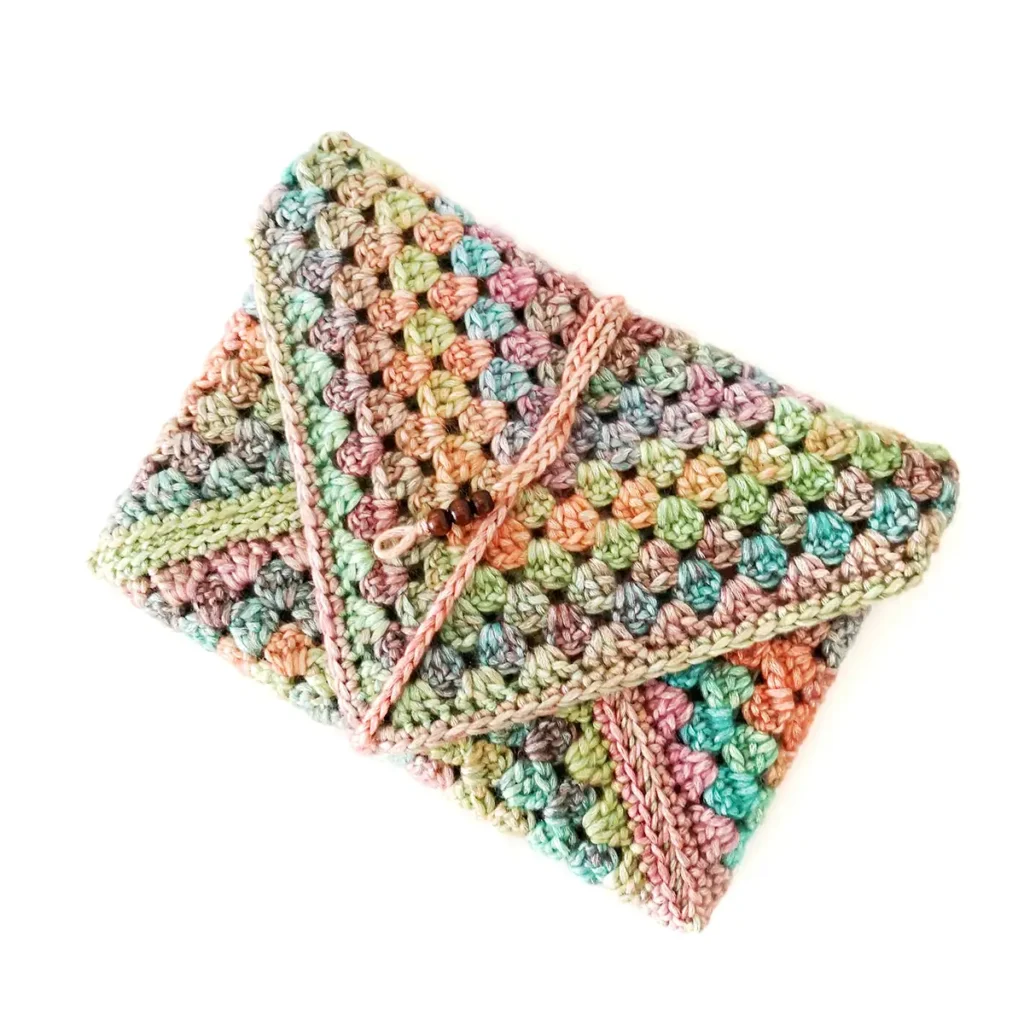
This crochet book sleeve is made from a single continuous granny square that’s been seamed up to make a pouch and finished with a beaded tie.
Recommended Yarn
You can use any yarn weight and fiber to make your crochet book sleeve. I used Caron Blossom Cakes in Radiant Rainbow with a 6mm hook for the sleeve pictured which gives a really pretty effect.
However, if you’re planning on purchasing new yarn for this project, I would choose something more durable and less fuzzy like a worsted weight cotton.
If you want your book sleeve to be more structured and less holey try dropping a hook size.
I recommend crocheting a quick swatch to see which hook size works best with your tension and chosen yarn.

Why You’ll Love This Granny Square Crochet Book Sleeve Pattern
Granny Square Crochet Book Sleeve Pattern
Grab the free downloadable PDF from the freebie library. The ad-free PDF includes detailed instructions and photos as well as easy print pages.
Freebie Library
Join our newsletter to gain access to exclusive freebies and keep up to date.
Already a member?
Login here.
Materials
- Worsted weight yarn, approximately 85g (I used Caron Blossom Cakes in Radiant Rainbow)
- 6mm crochet hook
- 5mm crochet hook
- Small wooden beads
- 1.5mm crochet hook or hook that’s small enough to fit through the centre of your chosen beads
- Yarn needle, scissors
- Optional: fabric glue
Abbreviations (US Terms)
- ch – chain
- dc – double crochet
- sc – single crochet
- stsc – stacked single crochet
- sl st – slip stitch
- st/s – stitch/es
- […] – repeat the instructions in brackets
- (…) – all stitches are worked in the same space
- (…) – indicates stitch count at end of round
Special Stitches
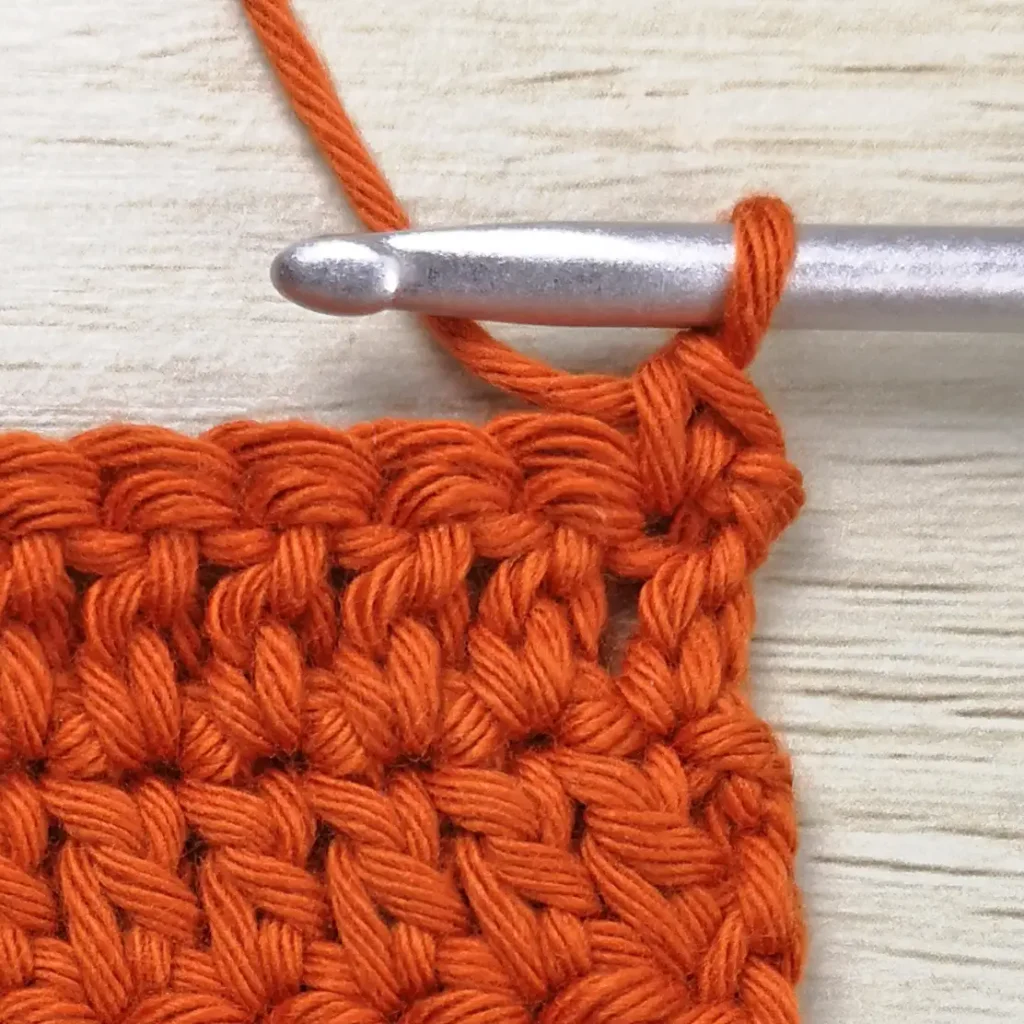
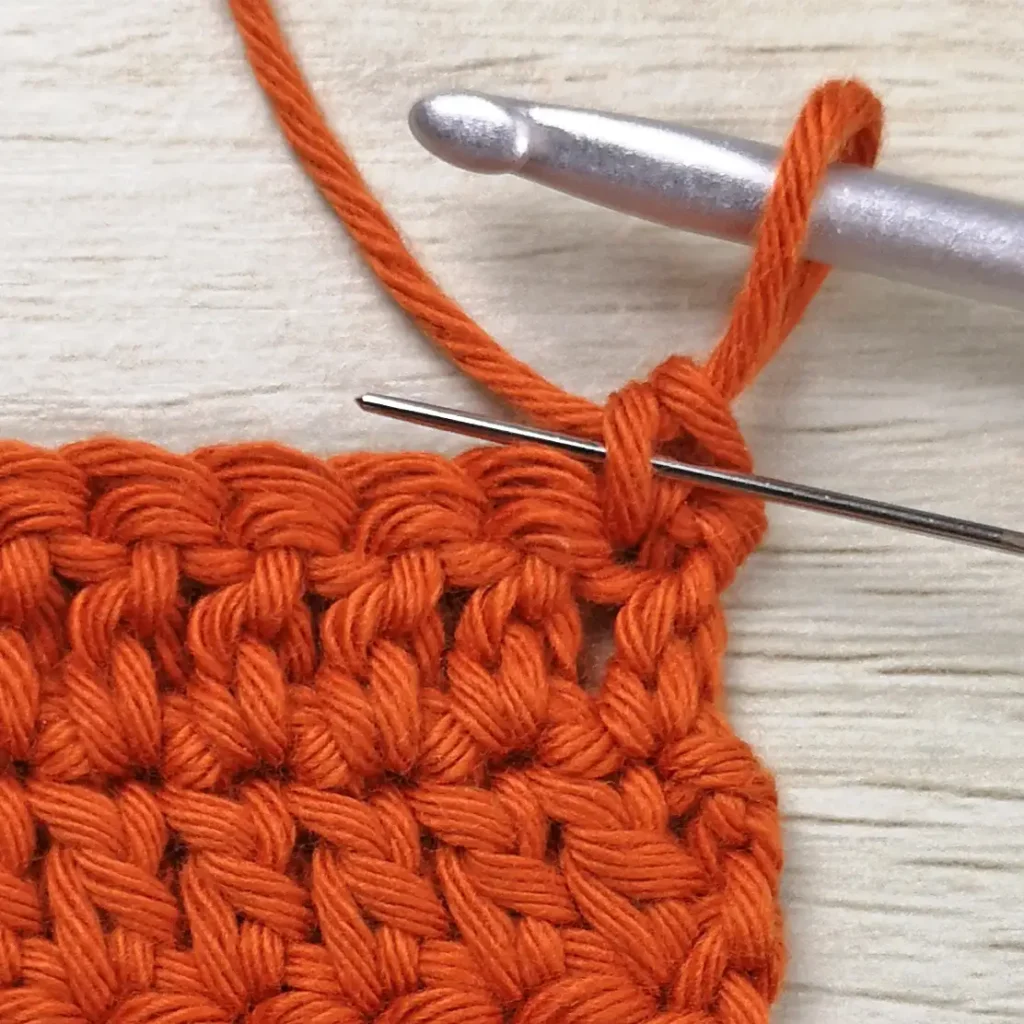
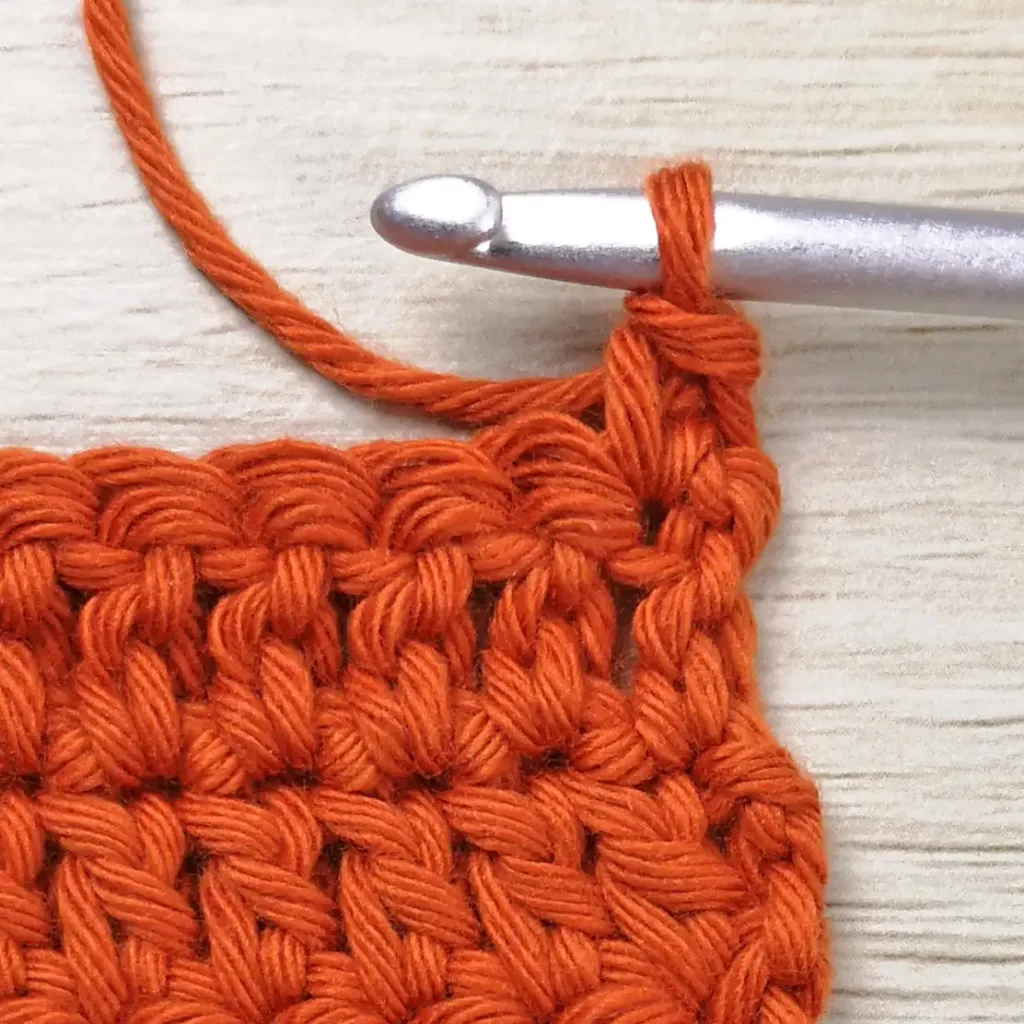
Stacked Single Crochet Stitch (stsc)
- Turn your work. Without chaining make a single crochet in the very first stitch.
- Insert your hook through the left vertical bar of the single crochet stitch. Yarn over and pull through (2 loops on hook).
- Yarn over and pull through both loops on hook to complete the stacked single crochet stitch.
Gauge
Gauge is not important in this pattern. However, using a different yarn and hook size will change the size and look of the finished item.
Notes
- The stacked single crochet at the beginning of each round counts as the first double crochet.
- Slip st at the end of each round under both top loops of the stacked single crochet stitch to join.
- Turn after each round.
- In each corner space – 3dc, ch 2, 3 dc
- In each space between clusters along the sides – 3 dc
Changing Colours
I used variegated yarn but for a different look, you can change colour at the beginning of any new round.
Skip the stacked single crochet at the beginning of the round and fasten off invisibly with the old colour to the first double crochet.
Join the new colour with a standing single crochet (this is the first half of the stacked single crochet), in the same space you would have started the next round. Complete the stacked single crochet.
Pattern Instructions
Crochet Book Sleeve (6mm crochet hook)
Make a magic ring.
R1: Stsc, 2 dc, ch 2, [3 dc, ch 2] x3 in magic ring, sl st to stsc (4 groups of 3 dc)
Tip: After each stsc, gently pull it over to cover the slip stitch join.
R2: Turn. Stsc into the first ch-2 space directly below your hook, (2 dc, ch 2, 3 dc) all in the same ch-2 space, [(3 dc, ch 2, 3 dc) in the next ch-2 space] x3, sl st to stsc (8 groups of 3 dc)
R3: Turn. Stsc into the space between the 3dc cluster directly below your hook, 2 dc in the same space, (3 dc, ch 2, 3 dc) in the ch-2 space, [(3 dc between the 3dc cluster on the side, (3 dc, ch 2, 3 dc) in the ch-2 space] x3, sl st to stsc (12 groups of 3 dc)
R4: Turn. Stsc into the space between the 3-dc cluster directly below your hook, 2 dc in the same space, (3 dc, ch 2, 3 dc) in the ch-2 space, [(3 dc between each 3-dc cluster on the side, (3 dc, ch 2, 3 dc) in the ch-2 space] x3, 3 dc between the next 3-dc cluster on the side, sl st to stsc (16 groups of 3 dc)
Repeat R4, placing (3 dc, ch 2, 3 dc) in each ch-2 space and 3 dc between each 3-dc cluster along the sides, until you reach the desired size for your book.
How to Know if Your Square is Big Enough?
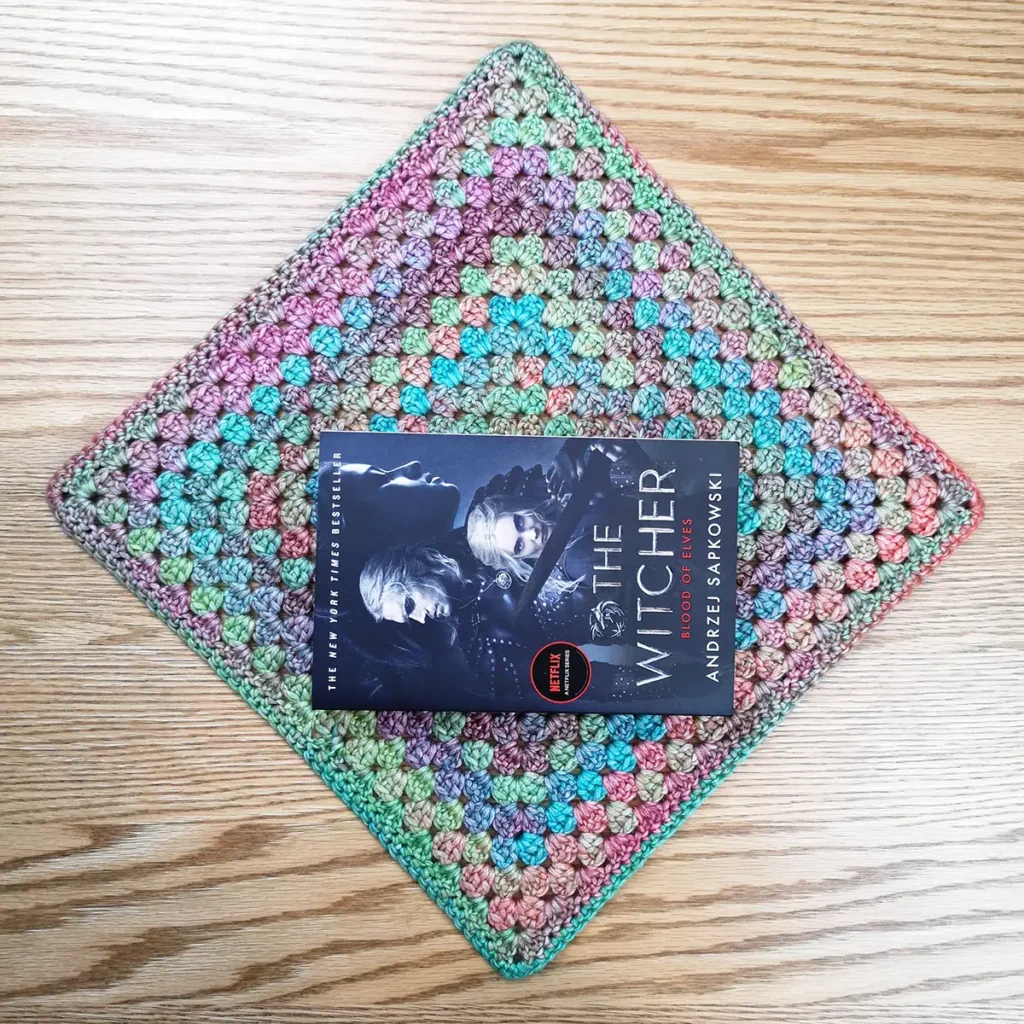
Lay the book on top of your square as demonstrated in the image below. Fold the 3 corners in towards each other. They should meet in the centre and the book should fit snugly with minimal gaps. Keep trying it on your book as you go.
The book sleeve pictured is made up of 15 rounds.

If you’re happy with the look and fit of your square as is, you can skip ahead to seaming. However, I like to add a single crochet border to strengthen and tidy up the edges.
Border (optional)
While there’s technically no right or wrong side to this book sleeve, I still think of the side with the tail from the magic ring as the wrong side and work the border accordingly.
The border is worked into the dc stitches themselves (not the spaces between) and the corner spaces.
If the right side of your square is facing you, there’s no need to turn. However, if the wrong side is facing you, turn before starting the border.
Ch 1, sc in each dc across until you reach the corner, (sc, ch 1, sc) in the ch-2 space.
Continue to sc around the sides, placing (sc, ch 1, sc) in each ch-2 space.
Fasten off invisibly and weave in ends.
Seaming
I find it easier to sew the book sleeve together with the book inside so go ahead and place your book folding in the corners as before. Make sure that the right side of your square is the side that’s on the outside of the sleeve when folded up.
Cut a long length of matching yarn (approximately 80 cm or enough to seam both sides when folded in half).
Fold in half and thread the looped end onto a yarn needle. Pull the loop of yarn through the ch-1 of the bottom flap (make sure to go under both loops of the ch and not into the ch space itself). Pull the tails through the loop and tighten.


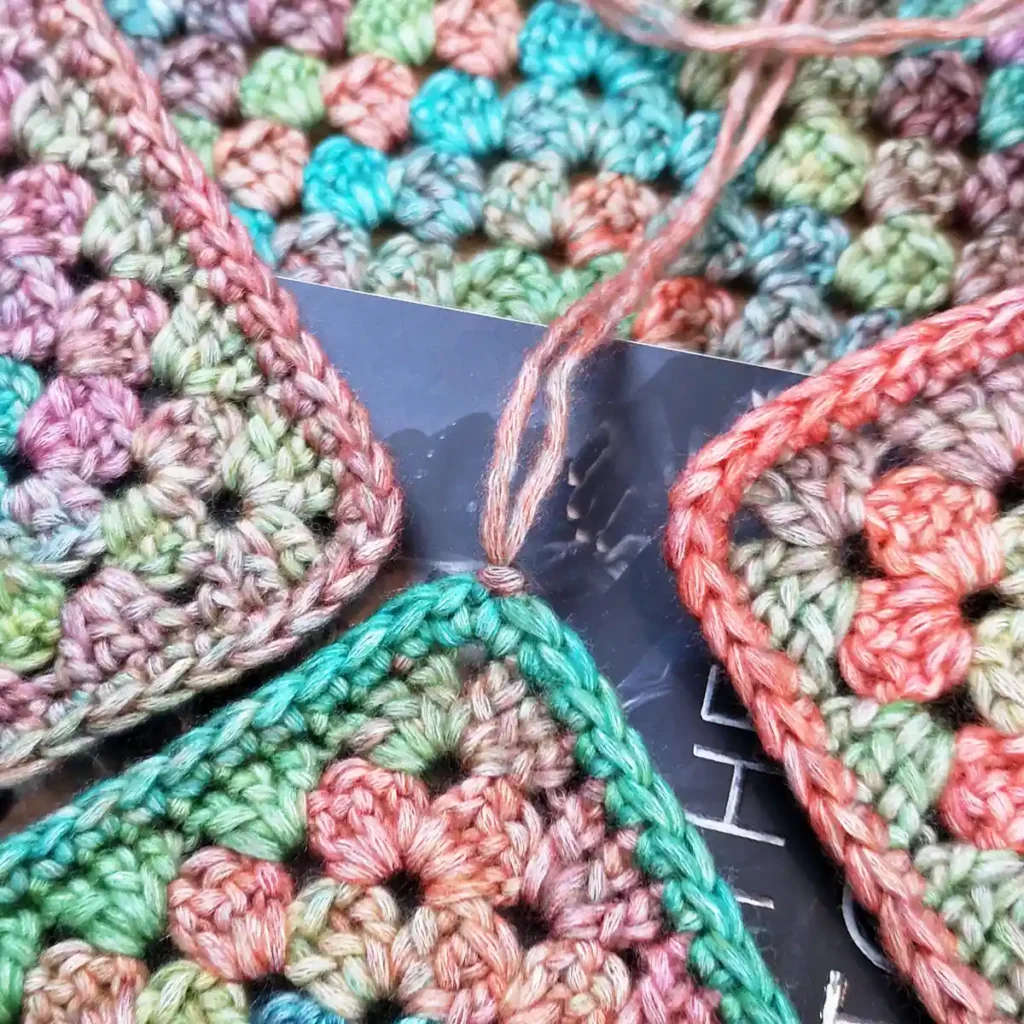
Starting on the left-hand side, thread the closest strand of yarn onto a yarn needle.
- Insert the yarn needle through the corresponding chain on the left flap (again going under both loops of the ch and not into the ch space itself).
- Next insert your needle under the inner loop of the bottom flap and the inner loop of the left flap. Draw through and pull tight.
- Continue to sew together using only the inner loops of both sides.
- Once you reach the bottom, make a small knot and weave in the end on the inside of the sleeve.


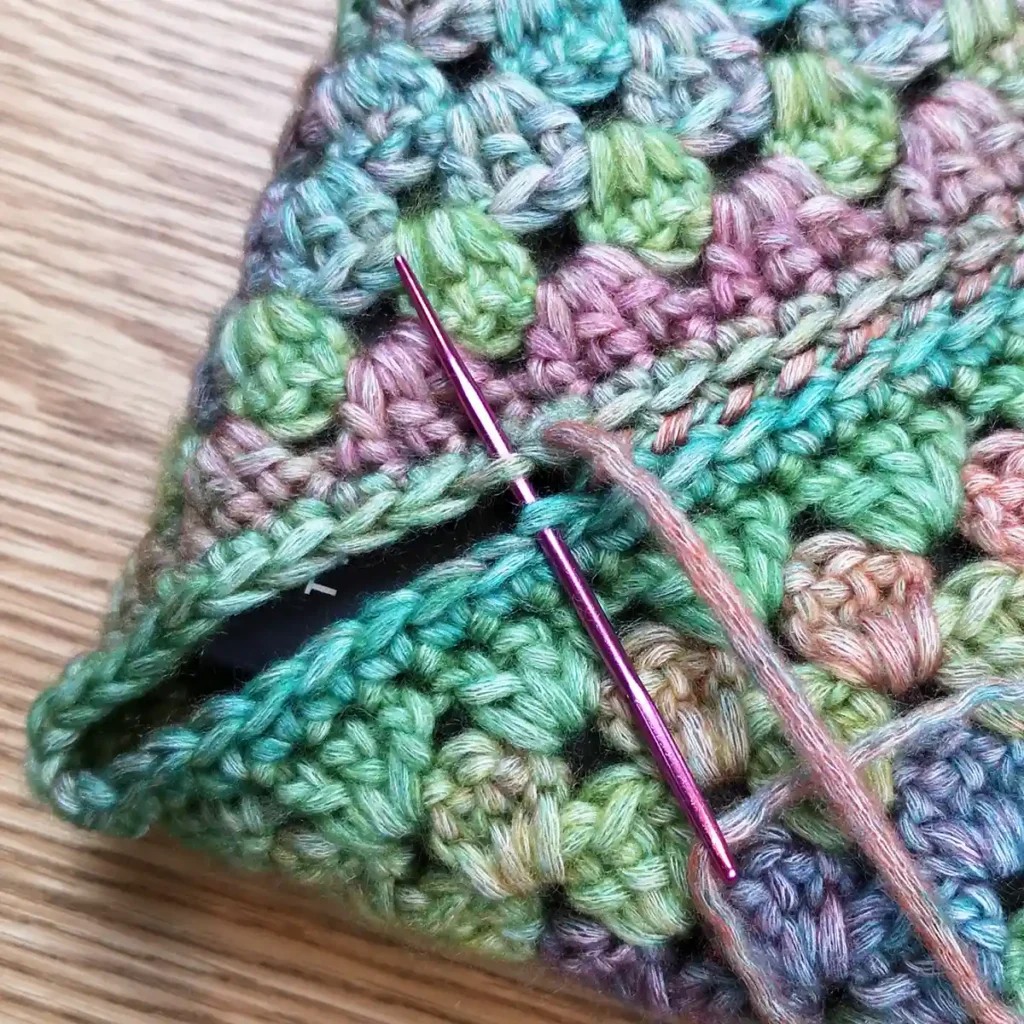
When starting the second side, insert the yarn needle through the corresponding chain on the right flap and make an extra stitch through the inner loops of the single crochet stitches on both sides above the chain 1 before repeating steps 1-4. This just tightens up where the flaps meet and gives a cleaner finish.


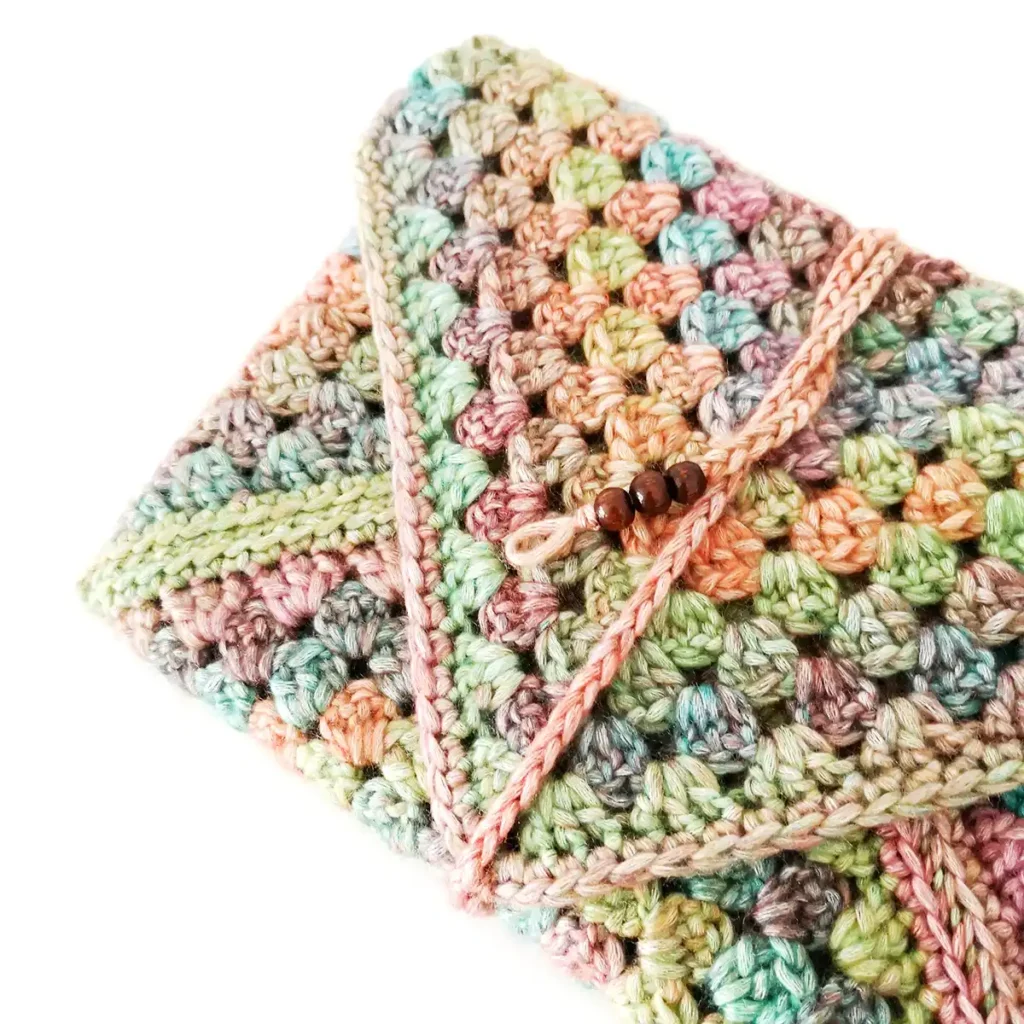
Beaded Tie (5mm crochet hook)
The tie is a simple chain that wraps around the book sleeve twice and is finished with some beads.
Adjust the length of the tie as needed by adding or subtracting chains. Bear in mind that it will stretch a bit and the beads will add some extra length as well. Try it for size as you go.
With the book sleeve facing away from you, insert your hook into the corner ch-1 space of the top flap. Place a slip knot on your hook and draw through, keeping the knot on the inside of the sleeve.

Ch 111
Fasten off leaving a long tail and tighten the last chain into a knot.
To add the beads, you’ll need a crochet hook that’s small enough to fit through the centre of the bead.
Insert the hook through the bead. Place a loop of the tail end of the yarn over the hook and pull through the bead. Repeat.
I added three beads but you can use as many beads as you like.
To finish off the end, I created a small loop and tied it in a knot as close to the beads as I could get. A small crochet hook is also helpful here to pull the yarn through.
Weave the remaining yarn tail through all three beads catching some of the knot and chain on each end. Repeat this process a couple of times before cutting the end close to the beads.
Optional: Add some clear drying fabric glue to the knot for extra security.


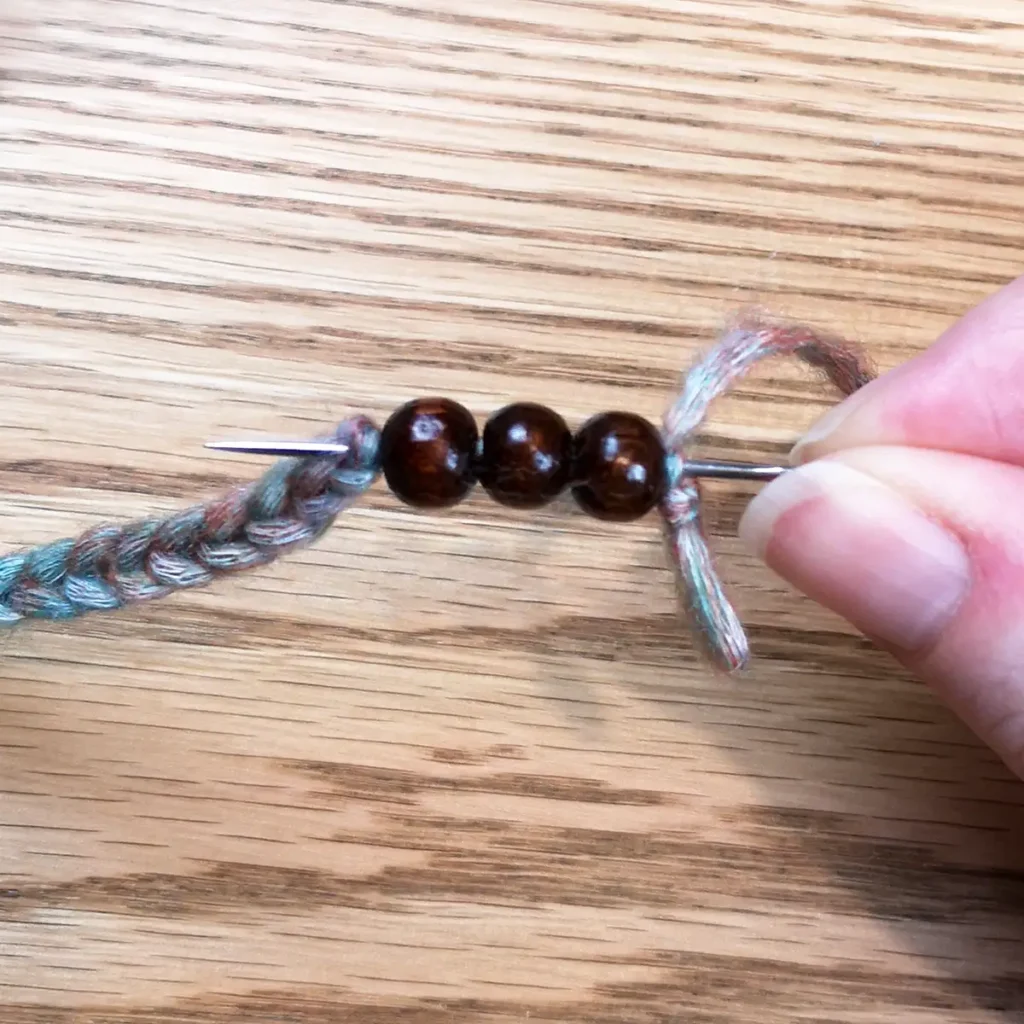
Weave in your starting tail before wrapping the chain around the book sleeve. Tuck the beaded end under the chain to secure.
not ready to make this yet?
Pin this post for later

Explore More Crochet Patterns
After you crochet this book sleeve, here are some more crochet patterns to try:
What’s Next?
Invitation To Our Facebook Group
We hope you enjoyed this pattern. Come and hang out with me in the Stitch by Fay Community Facebook group. We created this space for you to share pictures, ask questions and support each other.

This pattern is for personal use only and may not be copied, reproduced, altered, published or distributed in any format (including video). If you wish to share this pattern, you may link to this pattern but please do not reprint it on your site.
You can sell finished products made from this pattern in small quantities. Do NOT use our photos as your sale photos.
I am a very avid reader and this is a very beautiful pattern and I’m very excited about crocheting it thank you.
Made this as a gift for my daughter who is leaving for college this weekend. Worked up quickly & a good way to use up yarn left over from another project. I will definitely make more of these!